

How To Register At Osu With A Crn
OSU Registration Organisation
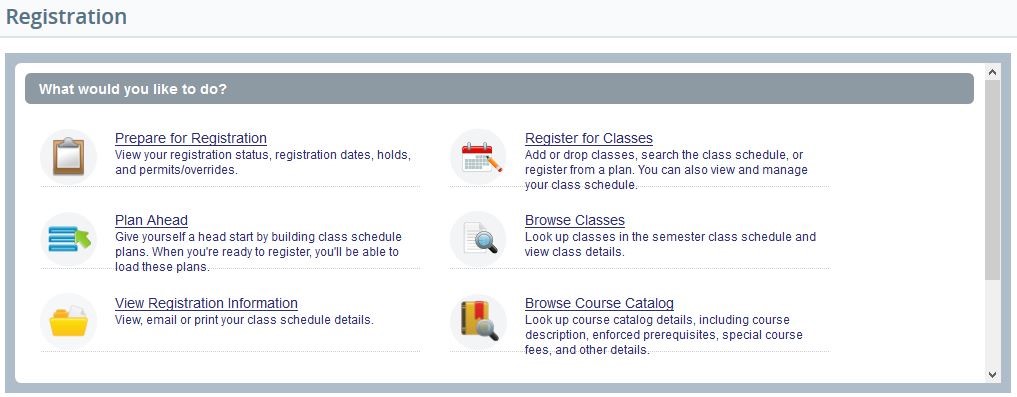
The new OSU Registration System interface (version 9 or XE) in Cocky-Service provides improved registration, class schedule, and course itemize tools for students, advisors, and faculty. Click a link below to acquire more:
- Prepare for Registration
- Programme Ahead
- View Registration Data
- Register for Classes
- Modify Credit Hours in a Variable Credit Class
- Browse Classes
- Scan Course Catalog
Prepare for Registration (Students only)
Set up for Registration allows you lot to view registration permits/overrides that have been granted to yous, and a summary of your declared curriculum and earned hours. Check your Educatee Contour in Self-Service for other information related to your upcoming enrollment. It includes details of your student status, academic standing, holds, registration time ticket details, and other details. It is a bang-up place to check for barriers which may prevent you from registering in the current or an upcoming term.
Plan Ahead
Programme Ahead is a tool for students and advisors to build grade schedule plans that tin can include courses and/or form sections, also every bit notes about individual classes or about the overall programme. Registration plans are typically built by students and/or their advisors before registration opens for a new term. Students can annals from a plan by clicking on thePlans tab in theRegister for Classes area.
How to employ Plan Ahead as a Student:
- Search for courses to add to a plan
- The new Part of Term column distinguishes full-length term classes from short courses:
- Part of Term = one indicates a regular full-semester class (or a regular viii-calendar week class in the summer term).
- All other Role of Term codes point a curt grade; view short course class offset and end dates in the grade schedule details.

- When creating a grade schedule plan, the course search now clearly reflects when no sections of the class are offered for the term:
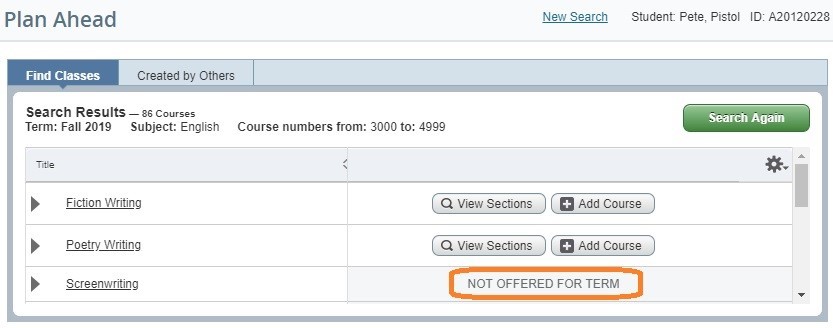
- One time you take identified the grade or department you would similar to add to the programme, click the Add together Class push to add the grade to the programme.
![]()
- You can attach notes to the overall plan or to each course by using icons.
- View the status of the course on the programme – when calculation new courses to the plan, practice non forget to save the plan in the lower right corner! If you are registered in coursework already for the term, yous will encounter those courses in each plan with a status of "Registered."
- As y'all review the courses or need to suit the courses inside the plan, you lot can delete a form by using the drop downs in the actions cavalcade.
Creating Additional Plans or Editing a Program:
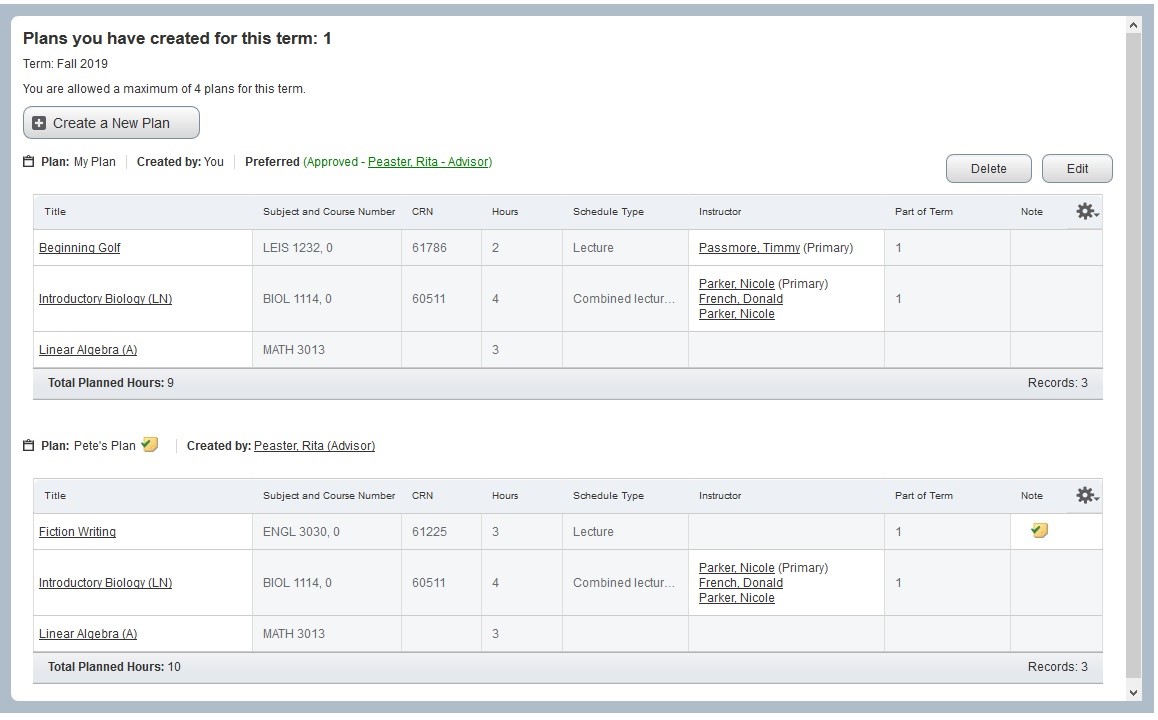
- Y'all can salve up to 4 plans per term.
- Yous tin can review with counselor and your counselor has the option to approve one of the plans created.
- If you only create one plan, information technology is by default marked equally preferred. Upon creation of boosted plans, you can adjust which programme is preferred by selecting the "Make Preferred" link.
- To Edit an existing Plan, click the Edit button. This volition take y'all into the plan where you tin can search for additional courses to add to the plan or employ the drop downwards to delete a course.
- To Delete an existing Plan, click the Delete button.
View Registration Information (Students merely)
Students can use this link to view their class schedule in diverse formats, and print or email their schedule. The default page displays the form schedule for a term in both simple list and calendar formats. The Schedule Details link (in the calendar format pane) displays more than detailed data about each grade, including showtime and cease dates, coming together days/times, classroom, and teacher(due south).
Click on a course title to admission full class details, including the catalog course clarification, textbook information, enforced prerequisites and other registration restrictions, and special course fees.
Annotation that these views of a class schedulebut reflect actively registered classes, and do not include withdrawn or waitlisted classes. Withdrawn classes (classes that have been dropped during the restrictive drib/add together period with an automatic grade of W assigned) and waitlisted classes (those in which yous are not yet registered, but are on the registration waitlist) tin can be seen in theAnnals for Classes area.
Register for Classes
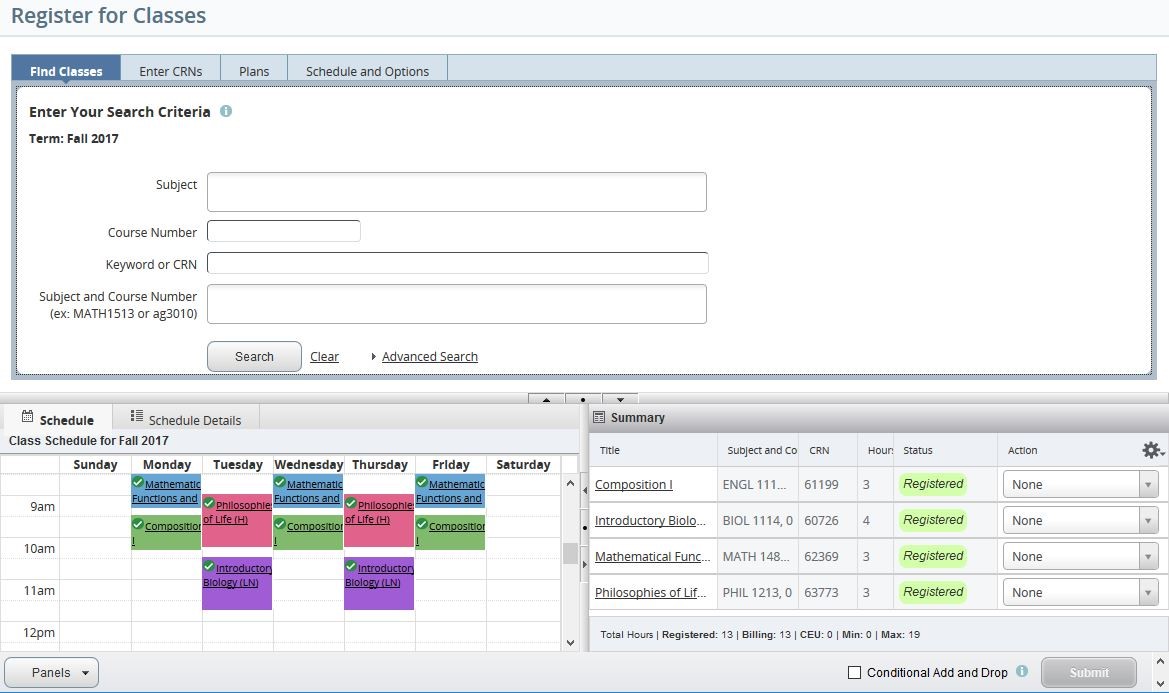
The default view inAnnals for Classes looks like the screenshot beneath. The acme pane allows you to search for classes, and the bottom panes show the educatee'southward class schedule summary – in a calendar format on the left and as a summary listing on the correct. As students add classes from the height pane, they are commencement added to the schedule Summary below in a "Pending" condition (like to a shopping cart). Students tin can encounter how the class would fit with their electric current class schedule before actually attempting to annals in the class. Students tin can besides drop and waitlist classes from here. Click a link beneath to learn more:
- Notice Classes or Enter CRNs
- Enroll from a Programme
- Driblet Classes
- Conditional Add and Drib
- Waitlisting
- Modify Credit Hours for Variable Credit classes
Find Classes or Enter CRNs
For details on how to use the top pane to detect classes, meet Browse Classes. Students that already know the CRNs of the classes they demand can click the Enter CRNs tab in the pinnacle pane to enter CRNs, and then click the Add to Summary button. If registration plans accept been created, students can click the Plans tab in the height pane to enroll from a plan.
After adding a class to the Summary, it volition beginning display in a Pending status reflected with a gray and white diagonal colour. Classes in Pending status have not yet been checked to run into if the student meets the enforced prerequisites or other form restrictions, and they are non part of the student's class schedule.

Students who wish to register in aPending class, must click theSubmit button in the lower right corner. Now the system volition check to see if the student meets the grade requirements. If the student does not want to register in aAwaiting class, they first need to modify the Activity to Remove and so clickSubmit. AllPending classes will automatically be dropped from the Summary when the student leaves or logs out of registration.
If the student clicks Submit and registration is successful, a green "Save Successful" bulletin will brandish in the upper right corner with no fault letters, and the status will modify to "Registered" in the Summary with a green groundwork color.

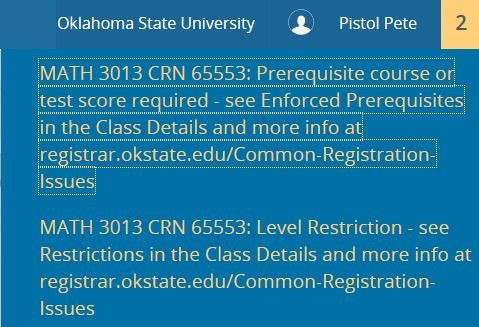
If the registration is non successful, error messages will display in the upper right corner, also known as the notification center, indicating all reasons the student wasn't able to annals in a class, and the status will change toErrors Preventing Registration with a red/pinkish background colour in the Summary. You may as well temporarily see the dark-green "Relieve Successful" bulletin in the upper correct corner above the mistake messages, but this only indicates that the registration fault checking has successfully completed. In the example fault messages below, there are two reasons preventing the student from registering in CRN 66469 – the student didn't meet enforced prerequisites, and the student's level (ex: undergraduate or graduate) didn't friction match the level restrictions for the form. For details on handling different registration error messages, click on the class championship and view enforced prerequisites and other restrictions in the Class Details, or refer to our Mutual Registration Issues page.
After reading the error letters, click the yellow box in the very upper right corner which reflects the number of fault messages to acknowledge that y'all've read the notifications. When errors exist for a class, the Action automatically changes to "Remove". After clicking the yellow notification box, you tin and so click the Submit push button to remove the grade from the Summary. All classes with a status of Errors Preventing Registration volition automatically exist dropped from the Summary when the pupil leaves or logs out of registration.
Enroll from a Program
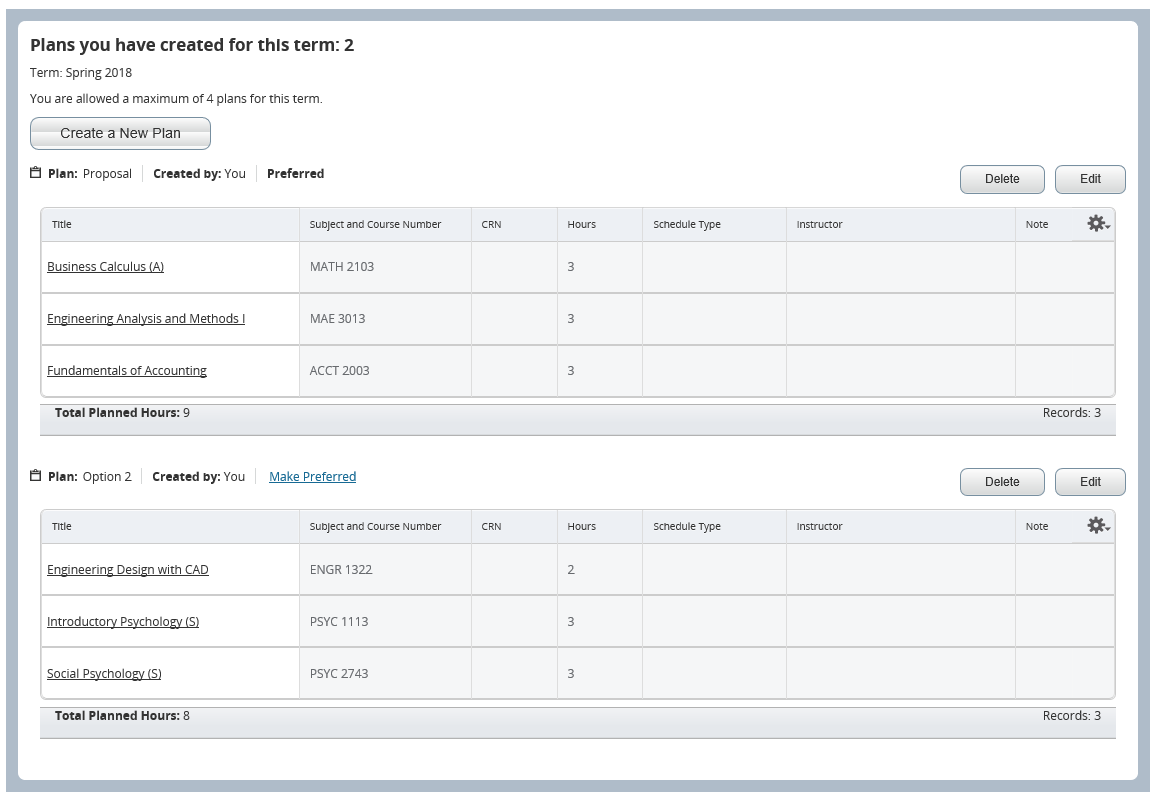
If registration plans have been created on Programme Ahead, students tin access them from the Plans tab of Registration and speedily add them to their Summary by clicking the Add together All push button at the top right of the plan. Then click Submit in the lower right corner of the Summary pane to register in the classes. If registration is successful, a green "Save Successful" message volition display in the upper right corner with no error messages, and the status volition change from "Pending" to "Registered" in the Summary with a green background color.
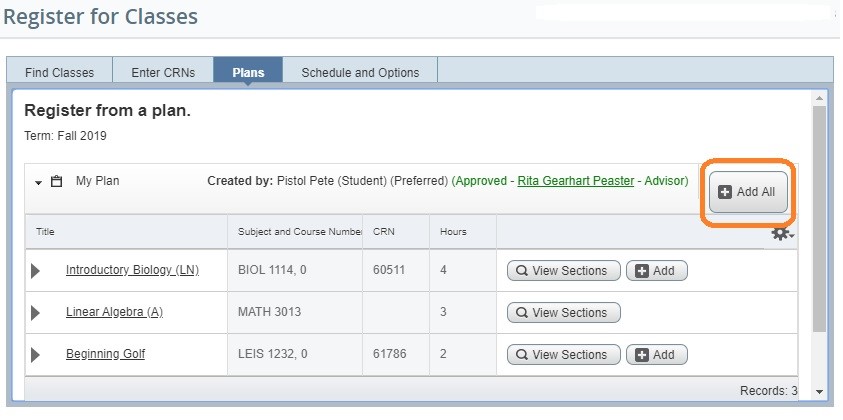
Before attempting to register from a plan, ensure that specific CRNs take been selected for every course on the preferred programme. If a CRN is missing for a class on the preferred plan, either edit the plan and select a specific section/CRN or select the specific department/CRN during registration past clicking the View Sections button. In the screenshot above, Linear Algebra (MATH 3013) is missing a CRN.
For details on handling different registration mistake messages, click on the class title and view enforced prerequisites and other restrictions in the Grade Details, or refer to our Common Registration Bug page.
Driblet Classes
To drop a registered or waitlisted class, click in theActiveness cavalcade for the course you wish to drop to see the options:
| Action | Description | Available During |
| Drib/Delete | Straight drop of class with no record on your transcript and a full refund of grade tuition/fees | Before the term begins and during the nonrestrictive drop/add period |
| Drib Partial Refund | Drib class with a partial refund of grade tuition/fees and no record on your transcript. | During the restrictive drop/add period |
| Drib with Automatic Due west | Drop class with an automated grade of W on your transcript; some or all grade tuition/fees assessed (see Academic Agenda) | Afterward the restrictive drib/add period and through the West drop/withdrawal deadline |
Select the drop choice (Drop/Delete, Drop Partial Refund orDrib with Automatic W) and click theSubmit button in the lower left corner. Upon successfully dropping the class, a dark-green "Save Successful" message will announced in the upper correct corner, and the status volition alter to either "Deleted" (for Drop/Delete), "Dropped" (for Drib Fractional Refund) or "Withdrawn" (for Driblet with Automatic W) in the Summary.

Students who are unable to drib a class online due to holds on their account may driblet classes by submitting a completed Drop/Add Menu to the Office of the Registrar (within applicable class drop/withdraw deadlines).
Note that classes dropped with an automatic W (displayed with a condition of Withdrawn) will proceed to brandish on the class schedule in theRegister for Classes surface area, and volition exist reflected on the official transcript with a grade of Due west after the end of the term. Withdrawn classes do non display in theView Registration Data area nor in thePupil Profile.
Conditional Add together and Drop Classes
Students who wish to drop a class simply on the condition that they are able to successfully register in another class should cheque the box next toConditional Add and Drop (just adjacent to theSubmit button in the lower right of the class Summary box).
- The class in which the student desires to register must be in the Summary box (with aPending status and Activeness ofWeb Registered).
- The class the student wants to drop conditionally should have an Action ofDrop/Delete.
- TheConditional Add and Drop box must be checked.
- Afterward all three of the higher up are in identify, click theSubmit button.
Waitlisting
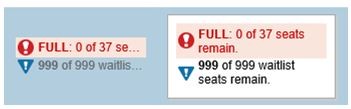
Some classes offer waitlisting, which allows students to go on a waiting list to register in a full/airtight form if a seat becomes available. When a full/closed class has a waitlist, information technology will show every bit full (with a red warning indicator) and how many waitlist seats remain.
Full classes with a waitlist tin can exist added to the form Summary, and students can add themselves to the waitlist by following these steps:
- Add the class to the Summary (it will be inPending status)
- Click in the Action column and select theWaitlist choice:
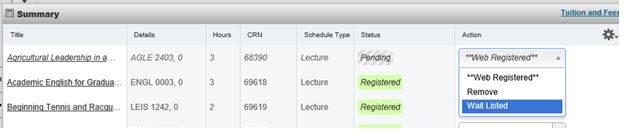
- Click theSubmit button in the lower right corner.
- If successfully added to the waitlist, the greenishSave Successful message will announced in the upper right corner and the class status will change toWaitlisted with a light-green background colour. You must meet enforced prerequisites and other class restrictions to be eligible to waitlist a class.
If a seat becomes bachelor to a student on the waitlist, that pupil volition receive an email notification of the available spot and the limited number of hours to register in the class. Upon receiving the email notification, if the educatee does not register in the form within the stated borderline, the pupil volition be automatically removed from the waitlist (and would need to repeat the process above to be added back to the waitlist).
Waitlisted students who receive e-mail notification of an available seat must follow these steps (within the stated borderline) to register in the class:
- Go to theRegister for Classes area and notice the waitlisted form in the Summary list.
- Click in the Activeness column and select the **WebRegistered** option.
- Click theSubmit button in the lower right corner.
- If successfully registered, students will run across the greenSave Successful message in the upper right corner and the form status will modify toRegistered with a green background colour.
Modify Credit Hours for Variable Credit Classes
While almost classes are offered for a stock-still number of credit hours (identified by the last digit of the course number), some classes are offered for variable credit. Near classes with a nil (0) in the concluding digit of the Course Number are offered for variable credit. One time registered in a variable credit class, students can adapt the number of credit hours in which they are registered (during the master term restrictive drib/add catamenia) by following these steps below. Note that after the primary term restrictive drop/add deadline, changes to credit hours for variable credit short courses must be done via a drop/add carte submitted to the Office of the Registrar.
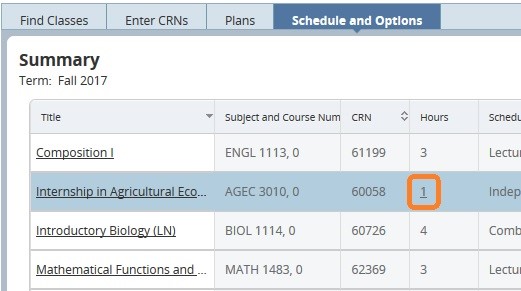
- Get to theRegister for Classes area and click theSchedule and Options tab in the upper pane.
- If the value in theHours field is underlined, that means the class is offered for variable credit (see AGEC 3010 and MATH 5000 in the example below):
- Click on the underlined credit 60 minutes value to edit. The field will change to let editing, and the range you must select from volition brandish (see example beneath).
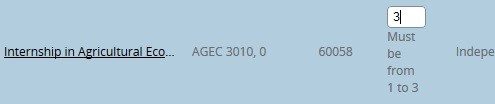
- Later making your changes, click theSubmit push button in the lower right corner.
- If successfully changed, students will see the light-greenSave Successful bulletin in the upper right corner, and the fullRegistered andBilling hours will exist adjusted.
Scan Classes
This is the new and improvedClass Schedule Search, and allows multiple means to search for class sections offered in a given semester. Afterward selecting a term, y'all can enter your search criteria in the fields provided, or click theAvant-garde Search link.
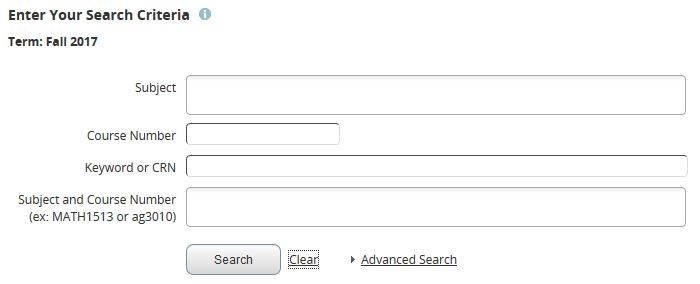
Here are some tips for entering search criteria in the newBrowse Classes tool:
- Entering a subject area is NOT required.
- To meet the available list of values for a search criterion, click in that field and the options will display below. Click on one or more options to include them in your search criteria. To narrow downward the values that display, starting time typing the clarification, then select the desired option from the smaller list that appears. (Note that adding multiple options in a unmarried search criterion will connect those options with an "or" when applying your search criteria.)
- The % wildcard grapheme can be used in theClass Number andTitle fields.
- To return open sections only, employ theAvant-garde Search and click theOpen Sections Only box (at the very bottom). Note that full/closed sections with waitlists volition display in the results.
- Click theClear link at the bottom to clear out all previous search criteria and start fresh with a new search.
Your search results will display in a list format similar to the image below:
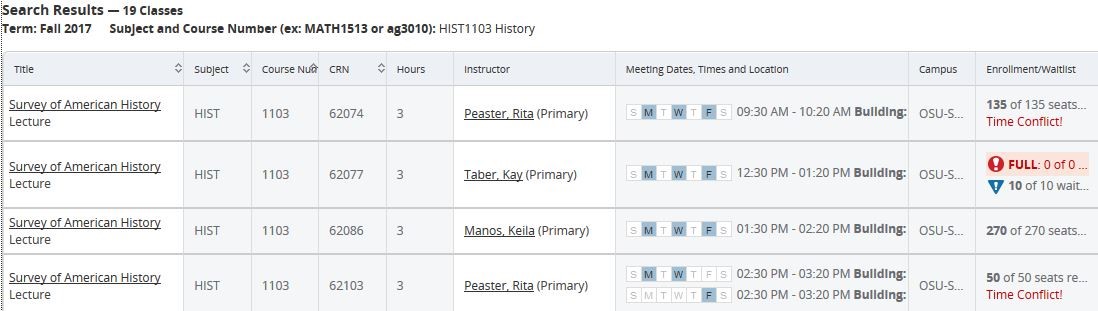
Here are some tips for viewing class details in the search results:
- If yous hover over something that isn't fully displayed, a pop-up box will appear that shows all of the details
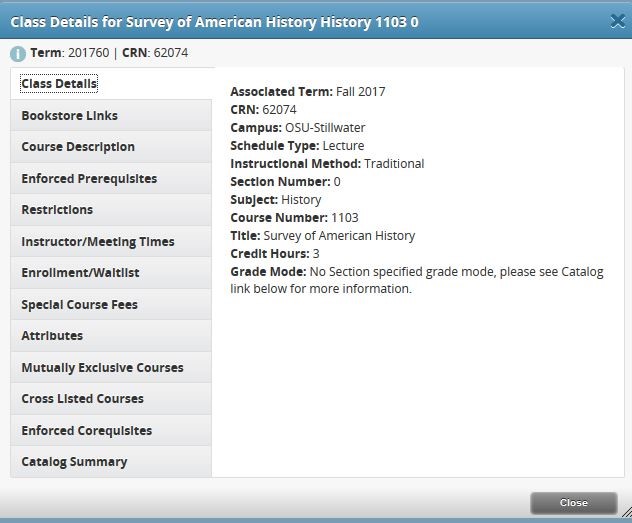
- Click on a class championship to access full class details, including the itemize course clarification, textbook information, enforced prerequisites and other registration restrictions, and special class fees:
- Utilize the vertical curlicue bar on the right (if needed) to view more sections on the page, the horizontal scroll bar on the bottom (if needed) to view more information most the classes, and use the page navigation tools in the lower left corner to admission more search results and/or conform the number of sections that display per folio:
![]()
- The lower right corner will display the number of form sections that matched your search criteria.
- To get-go a new search, click the greenSearch Once more push in the upper right corner.
Browse Class Catalog
This is the new and improved Class Catalog search option. The Course Catalog contains the entire form inventory for the term, although non all courses in the catalog will offer sections for that term.
After selecting a term, you can enter your search criteria in the fields provided, or click theAdvanced Search link.
Hither are some tips for entering search criteria in the newBrowse Course Itemize tool:
- Entering a subject is Not required.
- To see the bachelor listing of values for a search benchmark, click in that field and the options will display below. Click on i or more options to include them in your search criteria. To narrow down the values that display, start typing the description, and then select the desired option from the smaller list that appears. (Note that adding multiple options in a single search criterion volition connect those options with an "or" when applying your search criteria.)
- The % wildcard grapheme can exist used in theCourse Number andTitle fields.
- Click theClear link at the bottom to clear out all previous search criteria and commencement fresh with a new search.
Your search results will display in a list format like to the image below:
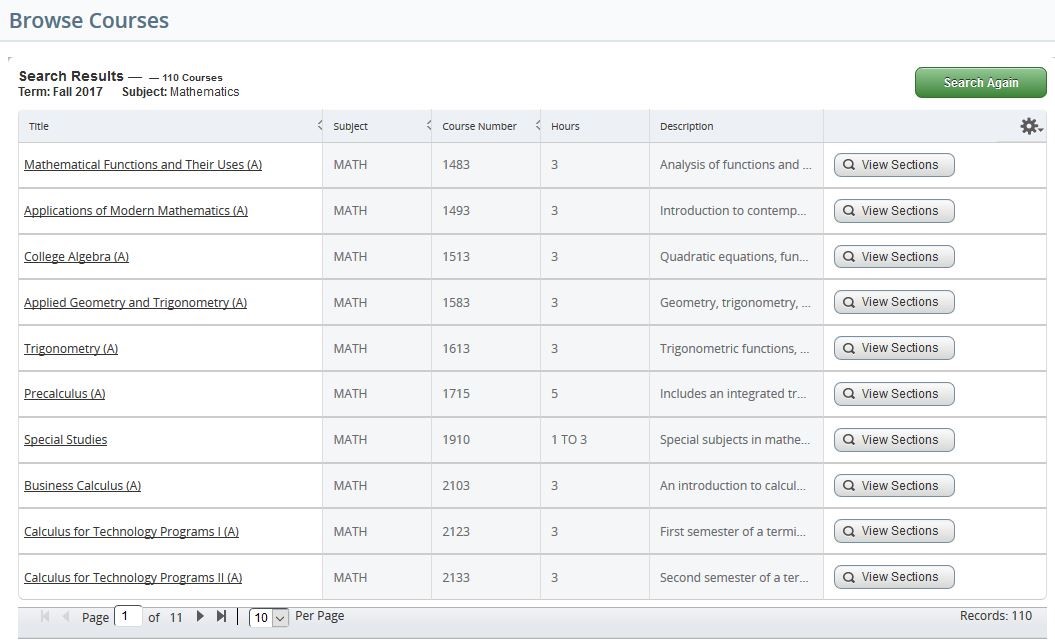
Here are some tips for viewing course details in the search results:
- If yous hover over something that isn't fully displayed, a pop-upwards box will appear that shows all of the details
- Click on a grade title to access total course catalog details, including the catalog course clarification, credit hours, level(south), schedule type, enforced prerequisites and other registration restrictions, and special class fees.
- Click on the View Sections push button to view the listing of form sections offered for that course in the term.
- To start a new search, click the greenSearch Again push button in the upper right corner.

How To Register At Osu With A Crn,
Source: https://registrar.okstate.edu/registration_enrollment/osu_registration_system.html
Posted by: richardsonnotheireat1971.blogspot.com
0 Response to "How To Register At Osu With A Crn"
Post a Comment